

There’s a lot more to the Start screen than meets the eye. It’s more than just a passing through location, because the screen can also keep you updated with information grabbed from the Internet. In this tutorial, you’ll learn “How to change or customize the Lock Screen Image on windows 8 step by step guide”. Checkout my another article to know How to disable or remove Windows 8’s Lock Screen step by step guide.
How to change or customize the Lock Screen Image on windows 8 step by step guide
The Lock screen is mostly controlled via a single settings screen. To get there, press Windows key + C to display the Charms bar, and select Settings → Change PC Settings → Personalize → Lock Screen. A screen appears, shown below, that displays your Lock screen image at the top. Just beneath it are other Lock screen images you can use.
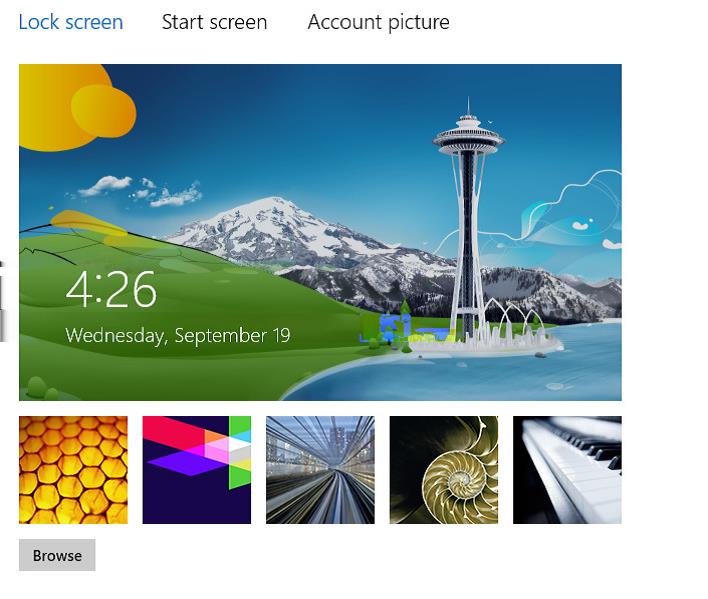
Click any one of them to make it the new Lock screen image. To find other images you can use for the Lock screen, click the Browse button and browse through your pictures. Select the one you want to use, click Choose Picture, and you’ll make it your new Lock screen image.
Lock Down the Lock Screen Image –
If you share your PC with someone, they have the same access to fiddling with it that you do. If you don’t want anyone changing your Lock screen image, you can tell Windows 8 not to let it be changed. Launch the Local Policy Editor by pressing Windows key+R to open the Run bar, type gpedit.msc, and press Enter or click OK. The Local Policy Editor launches.
Go to Computer Configuration → Administrative Templates → Control Panel → Personalization. Double click the “Prevent changing lock screen image” entry, select Enabled, then press Enter or click OK. Exit the Local Policy Editor.
Note : As described at the end of the previous tutorial on How to disable or remove Windows 8’s Lock Screen step by step guide, if you don’t have Windows 8 Pro and Windows 8 Enterprise, you can change the Lock screen by using a Registry hack. In the Registry Editor, go to HKEY_LOCAL_MACHINE\SOFTWARE\Policies\Microsoft\Windows\Personalization and create a DWORD called NoChangingLockScreen. Change its value from 0 to 1, exit the Registry Editor, and exit and restart Windows 8. If you don’t see the Personalization key, you’ll have to create it before creating the NoChangingLockScreen DWORD.
If you decide you want to change the Lock screen, repeat these steps, except select Disabled, press Enter or click OK, then exit the Local Policy Editor. The setting takes effect the next time you reboot.
Comment below if any doubt regarding How to change or customize the Lock Screen Image on windows 8 step by step guide.