
Every new blogger always ask this question that how to install and setup WordPress website in hosting, starting your blog mostly you need a blogging platform which you get from blogger and WordPress and many more companies. In the blogging world WordPress is most famous platform. which is used by millions of blogs and websites. for your blog and website you need hosting as well. In which you can store your blog or website’s data.
If you still don’t have bought hosting for your blog or website, you can check LIST OF TOP BEST AND CHEAP WEB HOSTING SERVICES FOR YOUR WEBSITE OR BLOG.
There are lots of web hosting companies in the internet world like hostgator and Bluehost who provide you the easiest way to install WordPress in their hosting in just five minutes.
Also read > how to resolve http error while uploading images
how to install and setup WordPress website in hosting , step by step tutorial
New bloggers need to know that how to install and setup WordPress website in hosting, and which points need to be take care so that you don’t get any problem in the future. So that i am giving you the step by step tutorial, to teach you how to how to install and setup WordPress website in hosting.
Here i’m teaching you how to install and setup WordPress website in hostgator India hosting. Installing WordPress inside hostgator India hosting is quite easy, Okay let’s start.
When we buy hosting, We get the login details from hosting provider e.g. Username and Passworrd.
Step 1:
To install WordPress first of all you need to login your hosting cPanel
Step 2:
Here we will get lots of options. first of all you will see the Softaculous Apps Installer option, Inside it’s scripts section you will get lots of scripts. and the first script should be WordPress, You can click there and open it if you want. Or you can scroll down to the option called Software in which you will see Softaculous apps installer. You need to click it and then click on WordPress script to open it.
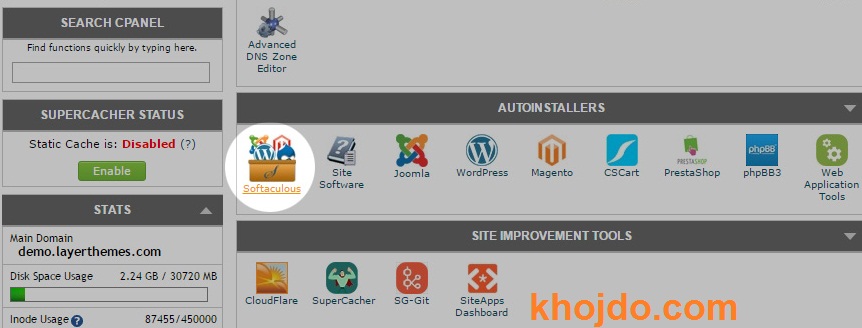
Step 3:
After clicking on Install you will be able to see it’s overview, and you will see two options Install now and my apps. click on Install now.
Now WordPress blog install page will open where you have to fill the correct details.
Step 4:
First section will be the Software setup, in which there will be 3 options.
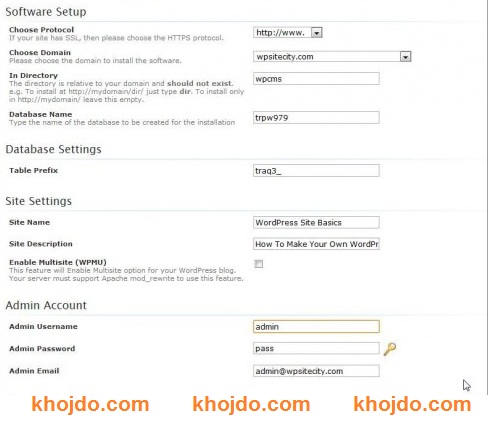
- Choose Protocol- in this option you have to decide that what you want to include in your blog. and how you want to see your blog name. If your site have SSL then you can choose https:// or you can choose https://www. as a protocol. It’s better to select https:// because your blog’s name is better to be small so that you can memories it easily and share it easily with others.
- Choose Domain- If you have more then one domain’s then you have to choose that domain name in which you want to install WordPress. If you have only one domain name then select it.
- In Directory – In this option you will have selected by default wp or you will see any other name, you need to remove that and leave this option blank.
Step 5:
Now Scroll down and go to Site setting secction where have to fill all the details correctly.
- Site Name – In the Site name you can choose your blog name.
- Site Description- Here you have to write about your blog in 4-5 words, that what is your blog about.
You can also write your site name and description after completing WordPress Installation if you want, Read my article How to change site title and Discription in wordpress.
Step 6 :
After Site setting there is Admin Account section, In which you have to fill all the information carefully.
- Admin Username– In this option you can choose a username for your blog e.g. Nitin or you can also add your mail e.g. nitin@gmail.com.
- Admin Password- Here you have to make a strong password so that nobody can find or steal it. and do remember your password because it is needed on the time of your WordPress dashboard login.
- Admin Email – Here you should add that email address which you are going to use to manage your WordPress. and carefully add the correct email address because in that email address your WordPress notifications and password links will be sent.
After that all the options are optional which your can fill after Installation 🙂 .
Also read > How to create account or signup in uc news
Step 7 :
Now you will see the Install button, Click on it. After click on Install button your installation process inside your hosting will be started. It will take max 3 minutes to install it properly. Make sure you Don’t close your browser window till the installation finishes .
After Installation you will get a success message and a link to your admin area, you can go there and put your username and password to login your WordPress dashboard thanks to read my article about how to install and setup WordPress website in hosting.
If you have any other question or query feel free to comment below or start a discussion in our forum 🙂
Money tanshfar